Welcome to the Pretty Paper, Pretty Ribbon Blog Hop!!
If you have come here from Ana Maria's blog then you are in the right spot! If you have stumbled upon this hop, please head back to Lisa's blog -
Pretty Paper, Pretty Ribbons - to make sure you don't miss out on anything!!!
I had a little help with my project today. Since these are little treat boxes for my daughters I thought I would let them choose which little character they would like on their own boxes. I knew they would forget about them by the time Halloween came around and they also had no idea what I was doing with the little characters....
I used print and cut with my Cameo along with Lisa's digital papers to make the pillow boxes.
I added some glossy accents over my character's eyes to give them some detail and popped them up with foam stickers. The sentiments are from Pink By Design, bling is from Michaels, twine is Grape Fizz from Trendy Twine.
I bought some little gummy spiders to put inside the pillow boxes. I also thought some of you might like to see a little tutorial of how I made these using the Silhouette Studio. I don't do tutorials often, but I am so excited about using print/cut along with digital papers that I wanted to share the awesomeness of it all!! :)
1. I started out by opening up a new project in my Silhouette Studio then selected the Letter size (since I am using a regular printer which only prints Letter size) in the Page Tools Window
2. Next I opened up the Registration Marks Setting Window and checked the box 'Show Reg Marks'. A grey pattern shows up along one edge of the sheet, as well as in one other corner. You will not be able to cut anything within this grey pattern. (CLICK ON PICS TO SEE THEM LARGER)
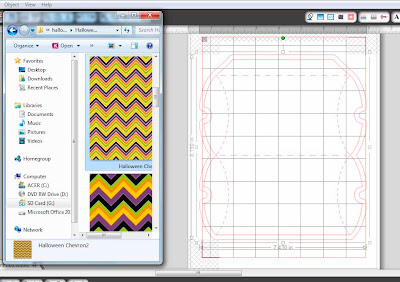
3. I opened a pillow box SVG through the library in the Silhouette software (which I had previously purchased this cut from the Silhouette store). I sized the cut to be slightly smaller than the max size my Letter sized sheet would allow (the red border).
I plan to fill my pillow box in with digital paper... If you have ever tried the print and cut feature with the Silhouette, sometimes you might notice the cut doesn't match up EXACTLY to the graphic, leaving a little white edge around your cut. Drives me nuts, so I have a few little tricks to make sure this doesn't happen to my cuts without wasting a bunch of printer ink. I create a little border around my cut which will be filled with a pattern to give the Silhouette a little room to be 'off' in its cutting.
4. First create an outline of the outside of the pillowbox.... Open up the Trace window, select 'Select Trace Area', and draw a box enclosing the whole pillow box. Uncheck the 'High Pass Filter' box, and slide the Threshold slider all the way to the right so the pillow box is outlined in yellow. Click 'Trace Outer Edge' option.
5. Select the outline you have just created... To select this outline, you might have to zoom right in. Once you have selected the trace line - and not the actual pillow box itself, which can be tricky sometimes - choose the Offset window. Choose offset then change the Offset Distance. I used 0.200, then clicked Apply. I then deleted the original outline that was created when we traced the pillow box.
6. Fill the new shape we created from Offsetting the outline of the pillow box. To do this, open a window where your digital paper is located. Make sure your outline shape is selected, then drag and drop the pattern you choose onto the outline shape.
7. Your outline shape should be filled with the pattern. Next, double check the cut lines in the Cut Style Window. It doesn't really matter if the outline gets cut, but it doesn't really need to get cut... Select the outline then choose No Cut. Make sure the original pillow box is outlined in red (as pictured) so that it WILL cut.
8. At this point you can print, send the print through your Silhouette to cut your pillow box and then decorate!! :)
I hope my tutorial was clear enough!! If you have any questions at all, feel free to contact me and I will clarify! I would love everyone to be able to have as much fun with digital papers as I have been having - the possibilities are endless! :)
MORE FUN!! :) Lisa is giving away goodies!!!
1. Be a follower of EVERY BLOG in our little hop. There are just 7 of us, so that shouldn't be too hard.
AND
2. Leave a comment at EACH blog along the hop. Be sure to let us know you are a follower and leave us your e-mail address.
That's all you have to do. If you would like EXTRA entries, you can also do one or more of the following:
4. Sign up for the Pretty Paper, Pretty Ribbons Newsletter and leave a comment on Lisa's blog telling her you did. You'll get a weekly e-mail telling you about new files, coupon codes/sales, and freebies. Don't forget to leave her the e-mail address you signed up with. :)
Lisa will randomly choose a winner of the big hop prize on Tuesday, October 23. Only US or Canadian mailing addresses, please.
Your next stop on the hop is my friend Melisa, over at
Enjoy the rest of the hop!!! :)
I am also going to enter this project into a couple current challenges...


